Review Manager 5.2诊断性试验系统评价手册

Review Manager 5.2 Tutorial
for Diagnostic test accuracy reviews
September 2012
Welcome to the RevMan Diagnostic test accuracy (DTA) Tutorial. This tutorial is designed to give Cochrane review authors an introduction to the process of writing a Cochrane systematic review of the accuracy of diagnostic tests using RevMan.
The tutorial does not provide all the information necessary to write a Cochrane DTA review, and does not address other types of Cochrane systematic reviews such as reviews of intervention studies or overviews of reviews. For detailed instructions on how to conduct a Cochrane DTA review, please refer to the Cochrane Handbook for Diagnostic Test Accuracy Reviews, available from the following website
https://www.sodocs.net/doc/612146477.html,.
Later parts of this tutorial rely on activities completed in the earlier sections, so we recommend you start working from the beginning. If you would like to skip ahead, click on the section you would like to read in the Contents list. The approximate time needed to complete this tutorial will be about three to four hours.
If you have technical questions regarding RevMan software, please contact the Cochrane Information Management System team at https://www.sodocs.net/doc/612146477.html,/revman. Other questions related to preparing protocols or reviews in RevMan should be directed to the relevant Cochrane Review Group.
About this tutorial
The tutorial for Cochrane diagnostic test accuracy reviews in RevMan 5 was developed by Mariska Leeflang in 2010, with assistance from the Australasian Cochrane Centre and the UK and Continental European Support Unit for diagnostic test accuracy reviews, and with funding from The Cochrane Collaboration Steering Group. The tutorial was revised in February 2011 to incorporate new features of RevMan 5.1 and in September 2012 for new features of RevMan 5.2. Please note that the results reported in this tutorial are fictional and were created by the authors for teaching purposes only. Note about using mouse right-clicks
Many of the functions in RevMan that involve selecting a button on the outline pane toolbar can also be achieved by right-clicking the sub-headings in the outline pane and selecting the function from the drop-down list.
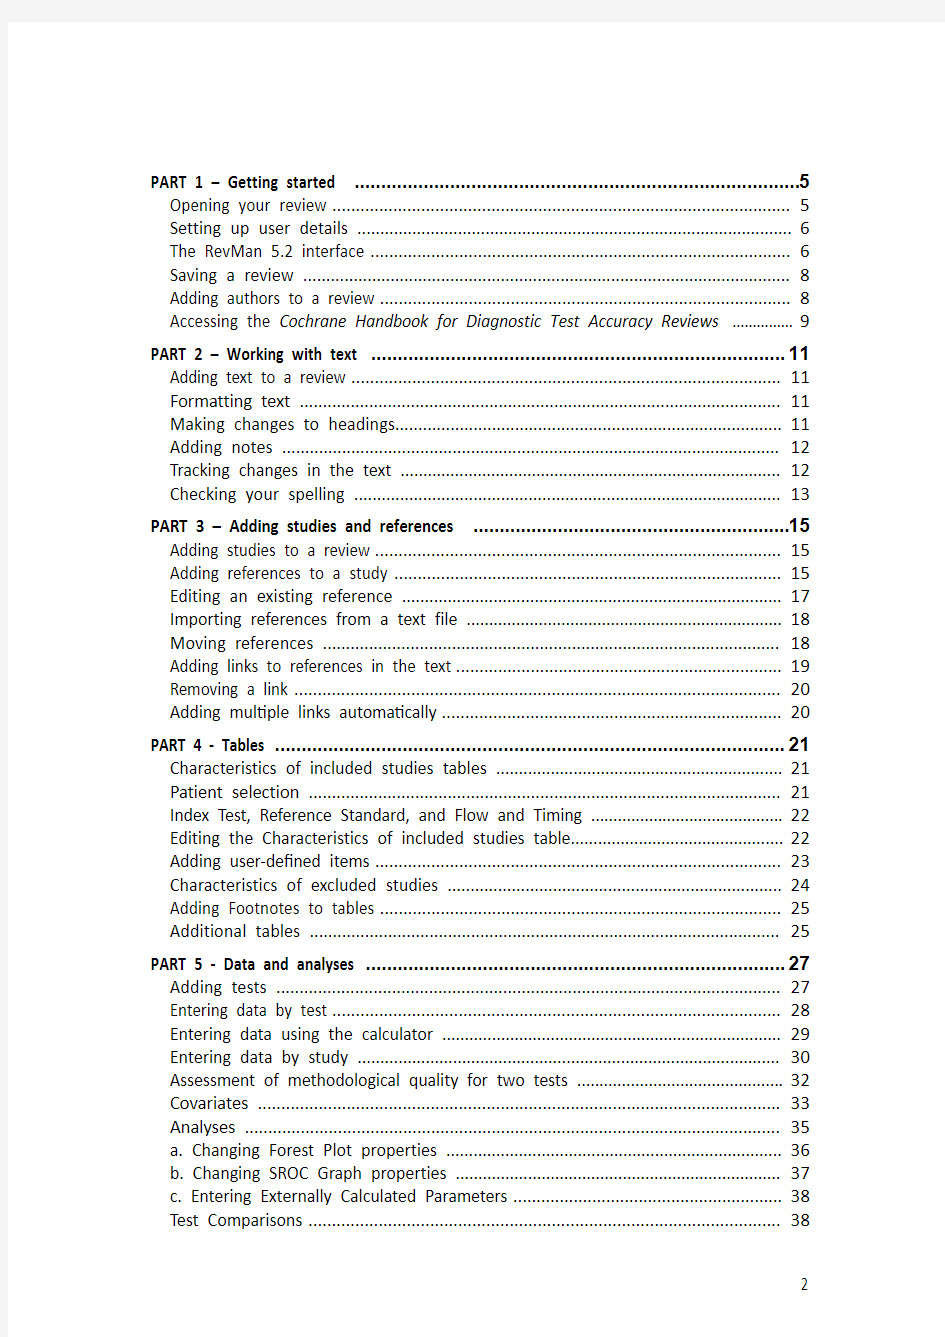
PART 1 – Getting started (5)
Opening your review (5)
Setting up user details (6)
The RevMan 5.2 interface (6)
Saving a review (8)
Adding authors to a review (8)
Accessing the Cochrane Handbook for Diagnostic Test Accuracy Reviews (9)
PART 2 – Working with text (11)
Adding text to a review (11)
Formatting text (11)
Making changes to headings (11)
Adding notes (12)
Tracking changes in the text (12)
Checking your spelling (13)
PART 3 – Adding studies and references (15)
Adding studies to a review (15)
Adding references to a study (15)
Editing an existing reference (17)
Importing references from a text file (18)
Moving references (18)
Adding links to references in the text (19)
Removing a link (20)
Adding multiple links automatically (20)
PART 4 - Tables (21)
Characteristics of included studies tables (21)
Patient selection (21)
Index Test, Reference Standard, and Flow and Timing (22)
Editing the Characteristics of included studies table (22)
Adding user-defined items (23)
Characteristics of excluded studies (24)
Adding Footnotes to tables (25)
Additional tables (25)
PART 5 - Data and analyses (27)
Adding tests (27)
Entering data by test (28)
Entering data using the calculator (29)
Entering data by study (30)
Assessment of methodological quality for two tests (32)
Covariates (33)
Analyses (35)
a. Changing Forest Plot properties (36)
b. Changing SROC Graph properties (37)
c. Entering Externally Calculated Parameters (38)
Test Comparisons (38)
Paired Test Comparisons (40)
Investigating heterogeneity (41)
Adding a figure to your review (42)
Risk of bias and applicability concerns graph and summary (43)
PART 6 – Finishing the review (44)
Summary of Findings tables (44)
Adding an appendix (44)
Validating a review (44)
Submitting a review for editorial approval (45)
Appendix – To convert to QUADAS-2 from QUADAS (46)
PART 1 – Getting started
Opening your review
All Cochrane reviews are stored in Archie, The Cochrane Collaboration’s central server for managing documents and contacts details. When you have registered a review with a Cochrane Review Group, they will set up a user account for you in Archie. To work on your review, you will need to find your review online in Archie and check it out into RevMan using the My Reviews button on the toolbar. Doing this opens a new window which provides information on the location of your reviews and what the next task for your review is. In this window you can check a review out
by selecting the title and pressing the Check Out button.
Before going ahead it is important to make sure that RevMan is currently in
‘Standard’ mode rather than ‘Non-Cochrane’ mode. ‘Non-Cochrane’ mode is a preference that allows users to specify that they are using RevMan to author reviews that will not be published in The Cochrane Library. In ‘Non-Cochrane’ mode, all Cochrane-specific functions like check in/out and connection settings to Archie are absent from the interface. To complete this tutorial you need to be in ‘Standard’ RevMan mode.
1.From Tools menu on the toolbar, select Preferences which will open the
Preferences window.
2.Under User mode on the General tab, confirm that the Non-Cochrane mode
option is NOT checked.
3.If the Non-Cochrane mode option is checked, uncheck it and press OK. A
warning will appear indicating that “Not all changes may take effect until you restart the program”. Click OK, and Exit out of RevMan and restart it.
4.If the Non-Cochrane mode option is NOT checked, simply click OK.
For this tutorial we will use a sample review called ‘Laboratory tests for caffeine addiction in PhD students’. Instead of checking the review out of Archie, it has been provided as an additional file with RevMan 5.2.
1.From the File menu, select Open, or click the Open button on the toolbar.
2.Find the folder where RevMan was installed on your computer. If you are
using Windows and accepted the default installation location, this will be
C:\\Program Files\Review Manager 5. If you are using Mac OS or Linux, the
tutorial files are copied to a subfolder of your home directory named
‘RevMan tutorial’.
3.Open the doc folder, and then the tutorial folder.
4.Select the file ‘Laboratory tests for caffeine addiction in PhD students.rm5’.
5.Click Open.
button on the toolbar. Be aware that if you create a review yourself, you cannot check it into Archie or use it for publication in
Setting up user details
If you will be using RevMan regularly on the same computer, you may wish to enter your user details (such as your name). RevMan will attach these user details to any editing done using track changes so that co-authors and editors can easily identify who has made the changes. Open your user details by selecting Preferences from the Tools menu. Enter your name directly or click Choose to find your details in Archie.
The RevMan 5.2 interface
When a review is open in RevMan 5.2, you will see there are two separate window panes that interact with each other as you navigate through the different sections of a review. The pane on the left hand side shows the outline of a review. This is referred to as the outline pane. The area on the right hand side shows all the information contained in a review. This is referred to as the content pane. The content pane will usually show the text of your review, but can also contain additional tabs for results, figures, etc.
In the outline pane, you can use the key icon next to each heading to expand and collapse subheadings. In the content pane, use the symbol.
RevMan allows you to change the appearance of the interface by selecting Preferences from the Tools menu and going to the Interface tab. The default Look and Feel of the interface is Metal. All screen captures presented in this tutorial display the Metal look and feel. It is also possible to set language and spelling options in the Preferences window.
By default, your new review is at the protocol stage, indicating that you are planning the methods for a review. Sections of a review that are not required at the protocol stage (but will be needed later for your completed review) appear as inactive (light grey) in both the outline pane and the content pane.
or review icon at the top
When you undertake a Cochrane review, the protocol must be completed and submitted for publication before moving on to the review stage. For this tutorial, to convert the file from the protocol stage to review stage, use the following directions:
1.Click the Properties button in the top-right of the content pane.
2.In the Properties window, select the General tab.
3.Note the automatically generated Version Number – this number will change
each time the review is checked into Archie. Note that you do not need a
separate Review Number unless your Review Group provides one.
4.Enter the Version Description ‘First draft’. When choosing a version
description, make sure it is brief and clearly indicates what’s different about
this draft, e.g. ‘Edited by [your initials]’ or ‘Methods section complete’.
5.For the Stage, select Full Review.
6.Click OK. Note that all of the section headings of the review are now
activated for inclusion (there are no light grey section headings).
Saving a review
When you have finished working on a review from Archie, we recommend that you always save the review by checking it back into Archie using the Check In button on the toolbar. This ensures the most recent version of your review is safely stored and can always be accessed from Archie by your co-authors and editors.
We recommend that you do not keep saved reviews on your computer, to avoid confusion with different versions. Be careful not to use a version of your review from your computer if a more recent version is available in Archie. If for some reason you do need to save a review to your computer, such as this tutorial review which is not
from Archie, go to the File menu and select Save As, or click the Save button on the toolbar. You can open a saved review by going to the File menu and selecting Open, or clicking the Open button on the toolbar.
RevMan also creates automatic backups of your review. See the Help menu for information on retrieving a backup file.
Adding authors to a review
For a real review, your Review Group will add your name as an author of the review when they create the file, along with any known co-authors. You may wish to add additional authors later.
There are two ways to add authors to a review:
?Add an author based on their record in Archie – this option allows you to add authors who are already listed in the Archie database. You will need to
have internet access and an Archie user account for this option.
?Add a local record (name only) that can be linked to Archie later – this option allows you to add authors that are not yet listed in Archie.
1.In the content pane, click the icon next to the Review information heading
to show further subheadings.
2.Click the icon to open the Authors section. Note that three authors have
already been added to this review.
3.In the outline pane, click the key icon next to Review information.
4.Select the Authors heading.
5.Click the Add Author button on the outline pane toolbar to open the New
Author Wizard.
6.Select Add a local record (name only) that can be linked to Archie later. Click
Next.
7.Enter your name in the First Name and Family Name fields.
8.Click Finish. You will now see your name listed next to the other authors of
the review. Note that no affiliation is available for your name. Affiliations can
only be added from records in Archie.
Under the author details in both the outline and content panes you will note that a Contact person can be specified for the review. By default, this is the first author, but another person (who may or may not be an author of the review) can be
nominated by selecting the Contact person heading in the outline pane and clicking
the Edit Contact Person button on the outline pane toolbar. The contact person
must be listed in Archie.
Accessing the Cochrane Handbook for Diagnostic Test Accuracy Reviews
For detailed instructions on what to report in each section of your review, you can
refer to the Cochrane Handbook for Diagnostic Test Accuracy Reviews. This can be
accessed from the Help menu, or by clicking the Handbook button in the top
right-hand corner of the content pane, which will open a new window that will allow
you to browse through all sections of the Handbook. A particular section of the Handbook can be opened in the new window depending on which section of the Main text you are working on.
1.In the outline pane, if it is not already expanded, click the key icon next to
the Main text heading.
2.Click on the word Abstract.
3.In the content pane, click the Handbook button (or right click and select
Handbook). Note that the Cochrane Handbook for Diagnostic Test Accuracy Reviews window has opened at the section with guidance on what to write in the abstract of the review.
4.Close the Cochrane Handbook for Diagnostic Test Accuracy Reviews
window.
PART 2 – Working with text
Adding text to a review
Text can be copied and pasted from a word processor document, imported as an html file or typed directly into RevMan.
1.In the content pane, if it is not already expanded, click the icon next to the
Background heading.
2.Click the icon next to the Target condition being diagnosed heading. A
blank line will open under the heading.
3.Click to place the cursor in the blank line and type “Caffeine addiction is a
common problem that affects productivity of PhD students, mainly due to
too much talking at the coffee machine.”
Formatting text
RevMan text formatting options are available from the toolbar, including bold , italics , underline , superscript , subscript , and highlighting text similar to most other word processing software. You cannot change the font or type size, as these are standard for all Cochrane reviews.
The Insert Symbol button allows you to insert symbols into the text of the review, including in tables and author names. You can also insert a non-breaking space. RevMan also allows bulleted and numbered lists , including multi-level lists. Making changes to headings
RevMan includes the standard headings for a complete Cochrane review, but new headings can be added and some standard headings can be deactivated.
1.In the outline pane, click the key icon next to Main text to reveal the
subheadings.
2.Click the key icon next to Background.
3.Click the key icon next to Clinical pathway.
4.Any heading with the icon is optional and can be deactivated. Right-click
the Alternative tests subheading and select Deactivate Heading
(alternatively, select the heading Alternative test(s) then click the button
on the outline pane toolbar and select Deactivate Heading from the drop
down menu).
5.Note that the heading appears deactivated (light grey) in the outline pane
and the text of the heading has been removed from the content pane.
6.In the content pane, click to place the cursor at the end of the text in the
Target condition being diagnosed section and press Enter to create a new
line.
7.On the toolbar, you will see a drop-down box showing the text style currently
in use. By default, text is in the Normal style. Click the drop-down arrow and
select Heading 3.
8.Type the text ‘Reference standard’. Note that formatting of Heading 3 is bold
and italics.
9.Press Enter again. Note that the new blank line is in the Normal style again. Adding notes
You can add notes to assist in drafting the review. These notes will not appear in the published version of the review.
1.In the content pane, make sure the cursor is still in the Background section.
2.Click the Notes button on the outline pane toolbar (NOT the Notes button
in the content pane). This will open the Notes window.
3.Enter a note, ‘This text needs revision.’ You will see the user details you
entered in the Preferences window at the beginning of the tutorial appears
at the bottom of the Notes window.
4.Click the Close button to save the note and close the window.
5. A yellow Note icon appears next to the relevant heading in both the
content pane and outline pane.
6.To see all the notes for a review while you are working, go to the View menu
and select Notes. A separate window pane will appear below the content
pane showing the notes for each section.
7.In the content pane, click to place the cursor back in the Background section.
The notes area will automatically display the note you have entered in that
section.
8.Click the icon at the top left of the notes area to minimise it, or go to the
View menu and select Notes to close the notes pane.
9.In the content pane, click the Note icon to open the Notes window again.
10.Click Delete to delete the note.
Tracking changes in the text
RevMan has a Track Changes system to help you manage editing in the text.
1.From the Tools menu, select Track Changes, or click the Track Changes
button on the toolbar. Note that the Track Changes button is now activated.
2.In the content pane, go to the Background section and replace the word
‘problem’ with the word ‘condition’. The old text will appear in red with a line through it, and the new text will appear in green.
3.In the same section of the review, change the word ‘at’ to ‘by’. Leave the
cursor in the text after your changes.
4.From the Tools menu, select Accept or Reject Changes. This will open the
Accept or Reject Changes window.
5.In the window you just opened, click the Find button with the arrow pointing
left to search backwards toward the beginning of your document.
6.The first change found will be the word ‘function’. The word will be
highlighted in the content pane. You may need to move the Accept or Reject Changes window out of the way to see the highlighted section of text. Click
Accept to accept the change.
7.RevMan will automatically find the next change and highlight the relevant
text. Click Accept again to accept the deletion of the word ‘at’.
8.Reject the rest of the changes you made by clicking the Reject All button.
9.Click OK.
10.In the content pane, change the word ‘problem’ to ‘condition’ again.
11.Hover the mouse pointer over the change. A popup message will appear
showing the user details and when the change was made.
12.Right-click each change (both the added word and deleted word) and select
Accept Change.
13.Turn off the Track Changes feature by clicking the Track Changes button
on the toolbar.
Checking your spelling
RevMan can either check your spelling as you type, or check all the spelling in your review at the one time.
1.From the Tools menu, select Preferences.
2.Select the Spell Checking tab.
3.Select which dictionaries you would like RevMan to use, including UK, US or
Canadian English. You can select more than one dictionary if you wish.
4.Click OK.
5.In the content pane, create a spelling mistake by deleting an ‘m’ from the
word ‘common’.
6.Open the Tools menu and select the Check Spelling option. This will open the
Check Spelling window.
7.Depending where your cursor was placed, RevMan may ask whether you wish
to continue checking from the beginning of the document. Click Yes.
8.RevMan will highlight the spelling mistake and suggest ‘common’ as the
correct spelling. Click Change.
9. A notice will appear to say that the spell check is complete. Click OK.
10.Click OK again to close the Check Spelling window.
11.To check spelling continuously while you type, go to the Tools menu and
select Check Spelling as You Type, or click the Check Spelling as You Type button on the toolbar.
12.Delete the ‘m’ from ‘common’ again, and click to place the cursor elsewhere
in the text. The spelling mistake will be underlined in red.
13.To correct the word, right-click it and select the correct spelling from the
options available.
PART 3 – Adding studies and references
There are two kinds of references that can be added to a review:
?References to studies – these are references to studies that have been either included or excluded from your review. A study can have more than one
reference, for example if there has been more than one published paper, or if you have received additional information from the study author.
?Other references – these are any other source you would like to cite in your review, such as background articles, methodological references, software,
etc.
Adding studies to a review
When you are ready to add included and excluded studies to your review, you will need to create a Study ID for each study, and then add the associated references. For Cochrane reviews, the Study ID is usually the name of the lead author of the main published paper and the year of publication. If you have more than one reference with the same name and year, you can add a letter to the year to differentiate them
(e.g. Egberts 2001a, Egberts 2001b).
1.In the outline pane, click the key icon next to Studies and references.
2.Click the key icon next to the Reference to studies section. You will see
that there are already some studies included.
3.Select Included studies and click the Add Study button on the outline
pane toolbar. This will open the New Study Wizard.
4.Enter the Study ID ‘Dorlas 2006’ and click Next.
5.From the Data source drop-down list, choose Published and unpublished
data. Click Next.
6.The year the study was conducted will appear by default as ‘2006’. Click Next.
7.If your study has an ID number, such as a document ID, you can enter it here
by clicking the Add Identifier button, selecting an ID type from the drop-
down list, and entering the ID.
8.Click Next.
9.Select Add another study in the same section and click Finish.
10.Repeat steps 4-9 and add the following studies to the tutorial review:
Egberts 2001
Levelt 2007
Smit 2006
11.When you have added the details for the last study, instead of step 9, select
Nothing and click Finish.
12.In the outline pane, click the key symbol next to Included Studies to see
the new studies listed.
Adding references to a study
1.In the outline pane, select the Dorlas 2006 study.
2.Click the Add Reference button on the outline pane toolbar. This will open
the New Reference Wizard.
3.By default, the Reference Type is set to Journal article (click the drop-down
list to see the other options available). Click Next.
4.Enter the following details in the form provided (note that fields appearing in
bold are mandatory):
Authors: Dorlas S, Egberts D
English title: Questionnaires to measure caffeine addiction
Journal/book/source: Journal of Addictive Research
Date of publication: 2006
Volume: 15
Issue: 4
Pages: 567-71
5.Click Next. As for a study, you will have the option to add an ID number for
the reference, such as a MEDLINE reference number.
6.Click Finish. The reference will now appear in the content pane. In the outline
pane, click the key symbol next to Dorlas 2006 to see the new reference listed.
Editing an existing reference
1.In the outline pane, double-click the reference listed under the Dorlas 2006
study (or right-click and select Edit Reference).This will open a new tab in the content pane showing all the details you entered.
2.Open the Reference Type drop-down box and change the type from ‘Journal
article’ to ‘Book’. Note that the fields have changed and some rows are now
shaded. Shaded rows will not appear in your published review.
3.Change the reference information to the following (you need to scroll down
to see some of these fields):
Authors: Dorlas S, Egberts D
Journal/book/source: Measuring caffeine addiction
Date of publication: 2006
Publisher Name: Grinder Press
City of publication: London
4.At the bottom of the reference tab, note that the reference is displayed as it
will appear in the published review. Note that this display changes as you
make the changes to the reference. Check that the reference appears
correctly.
5.Go to the tab header and click the button next to the first author’s name to
close the reference tab (do not click the button at the top right corner as
this will close the review).
Importing references from a text file
If you have already entered your references in another program, you can avoid typing them in again by importing them from a text file. A sample text file has been provided with RevMan 5 for this tutorial.
1.Go to the File menu and select Import, then References. This will open the
Import References Wizard.
2.Click Next.
3.RevMan should automatically open the same folder we used to open the
sample review: c:\\program files\review manager 5\doc\tutorial. Select the file ‘DTA Study References.txt’ and click Open.
4.You will see a preview of the text file. Click Next.
5.By default, RevMan Format is selected as the format of the text file (other
options include RIS or PubMed MEDLINE formats). Click Next.
6.By default, RevMan will save references to the Classification pending
references section, under Other References in the outline pane. References
in this section will not appear in the published review (for this reason they
are shown in grey). Click Next.
7.If you wish, you can assign different locations for each individual reference,
or exclude specific references from the text file while importing the rest. For
this tutorial, leave the settings as they are and click Finish.
8.RevMan will report that 8 references have been imported. Click OK.
9.In the outline pane, use the key icons to open the Other references section
and then the Classification pending references section. You will see the
references you imported.
Moving references
There are several ways to move references to the appropriate study.
1.In the outline pane, in the Classification pending references section, select
the reference Egberts 2001.
2.From the Edit menu, select Cut or click the Cut button on the toolbar.
https://www.sodocs.net/doc/612146477.html,e the key icons to open the Included studies section, and open the
Egberts 2001 study. An [Empty] reference has been added here. To add a
reference manually, you can edit the empty reference using the instructions
in the previous section.
4.Select the Egberts 2001 study.
5.From the Edit menu, select Paste, or click the Paste button on the toolbar.
6.The reference will be deleted from the Classification pending references
section and added to the Egberts 2001 study. Note that the [Empty]
reference has gone.
7.Go to Classification pending references and right-click Gunnink 2003.
8.Select Move to, then Included studies. As there was no study with a name
matching the reference, RevMan will automatically create a new study in the Included studies section with the ID Gunnink 2003.
9.Go to the Classification pending references section and select Kanis 2007.
10.Click and drag the reference to the Kanis 2007 study.
11.Repeat steps 1 to 6 and 10 to move the remaining references to the
corresponding studies.
12.In the outline pane, click the key icons to open the Included studies
section, and then open the Egberts 2001 study.
13.Select the first reference and double-click to open the reference tab.
14.In the content pane, check the This is the primary reference for the study
box.
15.In the outline pane, note that the book icon beside the primary reference
appears in black , and the icons beside the other references are grey . Adding links to references in the text
Rather than typing citations in the text or including footnotes, RevMan allows you to include active hyperlinks to references in the text of your review.
1.In the content pane, scroll up to find the Target condition being diagnosed
section.
2.Click to place the cursor after the word ‘machine’.
3.From the Format menu, select Insert Link, or click the Insert Link button
on the toolbar. This will open the Insert Link window.
4.From the list, select the study Gunnink 2003. Note that you can use this same
method to link to included and excluded studies, figures, tables, sections of
the review text and external web links.
5.Click OK. You will see a blue hyperlink to the reference appear in the text.
This link will be active after the review is published in The Cochrane Library.
6.Add a space before the link and parentheses ( ) before and after the link, so
that it appears as “…the coffee machine (Gunnink 2003).”
Removing a link
To remove a link you have already inserted in a review, you can either delete it as you would any other text, or use the Remove Link feature.
1.In the content pane, click to place the cursor in the link to Gunnink 2003.
2.Click the Remove Link button on the toolbar, or right-click and select
Remove Link. Note that the text is no longer blue.
Adding multiple links automatically
Instead of inserting one link at a time, RevMan can create all your links automatically by searching through the text to identify studies and other references.
1.In the content pane, select the sentence in the Target condition being
diagnosed section, including the text ‘(Gunnink 2003)’.
2.From the Tools menu, select Find and Mark Links.
3. A notice will be displayed to let you know that one link has been created.
Click OK. You will notice that the blue reference link has again been created.
). Click the
山东省普通高中学生综合素质评价信息管理系统操作手册学生用户手册-山东省点滴记录
山东省普通高中学生综合素质评 价信息管理系统 操作手册 学生角色
二〇一七年五月
目录 文档编写目的 (5) 功能简介及使用注意事项 (5) 第一部分首页 (7) 一、通知公告 (7) 二、结果公示 (8) 三、点滴记录 (9) 四、同学圈 (10) 第二部分点滴记录 (10) 一、任职情况 (11) 二、奖惩情况 (14) 三、典型事例 (19) 四、研究性学习及创新成果 (23) 五、日常体育锻炼 (28) 六、心理素质展示 (30) 七、艺术素养 (31) 八、社会实践 (36) 九、陈述报告 (40)
十、陈述总报告(只有高三才有) (42) 十一、材料排序 (42) 第三部分档案查看 (43) 一、学期档案 (44) 二、材料记录 (46) 第四部分课程管理 (47) 一、在线选课 (47) 第五部分我的课表 (48) 第六部分我的同学圈 (49)
文档编写目的 本文档用来指导学生用户快速学习、使用“山东省普通高中学生综合素质评价信息管理系统”(以下简称“综评系统”)。 功能简介及使用注意事项 1. 学生使用主要流程,如下图: 其中个人记录包含:任职情况、奖惩情况、典型事例、研究型学习、日常锻炼、心理素质、艺术素养、社会实践、陈述报告九大部分。 筛选排序包含:任职情况、奖惩情况、艺术素养三部分。 材料检查包含:基础信息、奖惩情况、日常操行、课程修习、校本课程、体测数据、学校特色指标、教师评语八部分。 2.学生帐号及使用: 建籍完成后生成:1学生1家长 账号为省学籍号
学校管理员导出初始化账号和密码 线下下发 学校管理员可重置其密码 注意:学籍号不可重复使用 家长可绑定手机——》找回密码 3.学生记录综评资料 随时记录班级提交学校公示(5天)归档(3.1/8.1/5.1)PC+移动端 点滴记录可选入档案 佐证材料:文件(图片)+链接(视频) 注意:实名记录 入档材料虚假取消高考资格 4.学生筛选综评资料,并排序 学期末筛选 毕业学期前排序省里统一划线 注意:进入档案依据 5.学生查看他人评价 学籍信息有误——>学籍系统中修改 体测数据有误——>体卫艺平台中修改
学生成绩分析评价系统使用手册
学生成绩分析评价系统使用手册一.安装JAVA运行环境 本软件需安装j2sdk1.4.0。 1.双击j2sdk1.4.0安装文件。 如图: 2.进入安装过程,确认安装声明。 如图:
(选择I accept the terms in the license agreement 点击Next ) 3.设定安装目录,在此推荐使用默认安装路径。 如图: (点击Next ) 4.安装 如图: (点击install 即可进行安装) 5.完成安装 如图:
(点击 Finish 完成安装) 二、配置环境 完成软件安装后,须配置j2sdk1.4.0+ Tomcat4.1运行环境。 ⒈配置j2sdk1.4.0 打开:控制面板系统高级环境变量。 A.在系统变量中选择:path编辑。
B.在“编辑系统变量”变量值(v)中添加j2sdk1.4.2_03下bin 的路径。 如:C:\j2sdk1.4.2_03\bin或F:\j2sdk1.4.2_03\bin D. 在环境变量中选择“新建”。在“新建系统变量”的变量名中填入: JAVA_HOME;在变量值中填入:j2sdk1.4.2_03的路径。 如:C:\j2sdk1.4.2_03 或 F:\j2sdk1.4.2_03
E.在环境变量中选择“新建”。在“新建系统变量”的变量名中 填入: CLASSPATH;在变量值中填入:j2sdk1.4.2_03的路径下lib 文件夹下tools.jar 的路径。如:C:\j2sdk1.4.2_03\lib\tools.jar 或 F:\j2sdk1.4.2_03\ lib\tools.jar 2.配置Tomcat4.1
科技型中小企业评价系统用户手册(企业端)
科技型中小企业评价系统 用 户 手 册 2017年10月
目录 1. 引言 (1) 1.1编写目的 (1) 1.2文档适用范围 (1) 2. 功能模块简介 (1) 2.1企业用户功能模块 (1) 3、运行环境 (1) 4.使用说明 (2) 4.1账户注册登记 (2) 4.1.1 企业注册登记承诺书 (2) 4.1.2 用户注册登记 (3) 4.1.3 密码找回 (5) 4.1.4 邮箱找回 (7) 4.2系统主界面 (9) 4.2.1修改密码 (9) 4.3用户信息管理 (10) 4.3.1 企业注册登记 (10) 4.3.2 企业信息管理 (12) 4.4 评价信息管理 (13) 4.4.1 企业填报材料 (13) 4.4.2 填报材料保存 (18) 4.4.3 自评结果 (18) 4.4.4上传封面文件 (20) 4.4.5 提交填报信息 (20) 4.4.6 填报材料状态 (21) 4.5 审批进度查询 (22) 4.5.1查看当前状态 (22) 4.5.2 查看审批进度 (22)
1.引言 1.1编写目的 本用户手册对如何使用科技型中小企业评价系统做了详细介绍。文档主要包括引言、功能简介、用户操作说明等内容。 1.2文档适用范围 适用于在该系统中注册登记的所有用户。 2.功能模块简介 2.1企业用户功能模块 (1)用户信息管理 (2)评价信息管理 (3)审批进度查询 3、运行环境 (1)IE11; (2)Google Chrome; (3)360极速模式(9.1版本或以上); (4)360兼容模式(内核IE9以上); (5)firefox(建议使用Google Chrome或360极速模式)。
中小学生综合素质评价系统用户手册---学生部分
海淀区 中小学生综合素质评价系统 用户手册 (学生部分) 海淀区教育信息中心 2010年3月30日
目录 第1章系统登录 (3) 1.1操作步骤 (3) 1.2注意事项 (3) 第2章学生自评 (4) 2.1操作步骤 (4) 2.2注意事项 (6) 第3章同学互评 (7) 3.1操作步骤 (7) 第4章自我介绍 (9) 4.1操作步骤 (9) 4.2注意事项 (12) 第5章特长展示 (12) 5.1操作步骤 (12) 5.2注意事项 (14) 第6章学习情况 (14) 6.1操作步骤 (14) 6.2注意事项 (15) 第7章身体情况 (16) 7.1操作步骤 (16) 7.2注意事项 (16) 第8章荣誉称号 (17) 8.1操作步骤 (17) 8.2注意事项 (18) 第9章综合实践 (19) 9.1操作步骤 (19) 9.2注意事项 (21) 第10章课外学习 (22) 10.1操作步骤 (22) 10.2注意事项 (23) 第11章校内活动 (24) 11.1操作步骤 (24) 11.2注意事项 (25)
第1章系统登录 1.1 操作步骤 第一步:打开IE浏览器,地址栏中输入网址:58.118.0.150,系统进入登录界面。 第二步:输入用户名和密码。 第三步:点击【确定】按钮,完成登录。 1.2 注意事项 登陆系统用户名为学生学籍号。
第2章学生自评 2.1 操作步骤 第一步:点击进入【学生自评】,进入学生自评界面。 第二步:拖动鼠标至页面下半部【评价内容】模块,用户选中问卷中的选择题目,输入评语进行个人评价。
及总分。 第四步:点击【确定】按钮,完成自评。
系统性能评估
第7章 1.工程工作站:具有实现工程计算、程序编制和调试、作图、通信、资源共享的计算机环 境。 2.早期CAD环境:“大型机(超级小型机)+多路终端 3.工作站从应用对象、范围和功能需求上都不同于普通PC机 4.工作站与PC在配置上的一般区别:1. 图形处理能力:专业图形卡2. 可靠性: 采用多种 可靠性措施3. 性能: 采用高性能器件4. 扩展能力: 内存、多处理器等5. 软件配置: 操作系统、高性能图形处理软件等。 5.系统性能评价技术:从技术上, 主要有分析、模拟、测量三种技术 6.常采用的分析技术有:常采用排队论、随机过程、均值分析等方法进行近似求解,比如 流水线性能、多处理器系统性能分析、软件可靠性静态评估等。 7.分析技术的特点:特点是理论严密, 对基础理论的掌握要求较高。优点是节约人力/物 力, 可应用于设计中的系统。 8.模拟技术的特点:既可以应用于设计中或实际应用中的系统, 也可以与分析技术相结 合, 构成一个混合系统。 9.测量技术的特点: 10.模拟技术是基于试验数据的系统建模, 主要有: (1) 按系统的运行特性建立系统模型; (2) 按系统工作负载情况建立工作负载模型; (3) 编写模拟程序, 模拟被评价系统的运 行。 11.测量技术:该技术是对已投入使用的系统进行测量, 通常采用不同层次的基准测试程序 评估。不同层次指的是:核心程序、实际应用程序、合成测试程序 12.几乎所有基于模拟的评价方法都依赖于测试数据或实验值 13.总结:分为三种性能评价技术,分别是分析、模拟、测量,这三种技术分别对用不同成 熟度的系统。分析技术对应理论研究,特点是理论严密,基础知识掌握度高。模拟技术是对正在设计以及已经用于实际应用的系统进行建模,建模数据来源是实验数据。而测量技术的应用是对已经投入使用的系统进行测量。通常采用不同层次的基准测试程序,不同层次值的是:核心程序、实际应用程序、合成测试程序。 14.系统性能评价对象:内存、I?O、网络、操作系统、编译器的性能。 15.与程序执行的时间相关的两大因素:(1) 时钟频率(MHz);(2) 执行程序使用的总时钟周期 数。 16.CPU时间= 总时钟周期数?时钟周期= 总时钟周期数/ 时钟频率 17.IC(程序执行的指令数)和CPI(每条指令所需时钟数 18.CPU时间= CPI?IC ?时钟周期= CPI?IC /时钟频率 19.(1) 时钟频率: 反映计算机实现、工艺和组织技术; 20.(2) CPI: 反映计算机实现、指令集结构和组织; 21.(3) IC: 反映计算机指令集结构和编译技术。 22.系统性能评价标准:(1) 时钟频率(主频): 用于同类处理机之间(2) 指令执行速度法 (MIPS —定点运算) (3) 等效指令速度:吉普森(Gibson)法4)数据处理速率PDR(processing data rate)法(5) 基准程序测试法 23.MIPS指标的主要缺点是不能反映以下情况: ①不能反映不同指令对速度的影响②不能 反映指令使用频率差异的影响③不能反映程序量对程序执行速度的影响 24.吉普森(Gibson)法的主要缺点:(1) 同类指令在不同的应用中被使用的频率不同;(2) 程序 量和数据量对Cache 影响; (3) 流水线结构中指令执行顺序对速度的影响;(4) 编译程序对系统性能的影响。
普通高中学生综合素质评价系统使用说明书
普通高中学生综合素质评价系统 (V 5.0) 安装使用说明书 合肥华兴教育软件科技开发有限公司 目录 一、前言 (1) 二、系统简介 (2) 三、系统安装配置 (2) 四、评价用户类型 (3) 五、学校评价流程 (4) 六、各用户操作内容 (5) 1、Admin管理员用户 (5) 2、综合素质评价组组长及成员 (6) 3、新课程领导小组组长及成员 (7) 4、班级评价小组组长及成员 (8) 5、学生用户 (9) 七、技术支持............................ 错误!未定义书签。 一、前言 为深入推进普通高中新课程实验,根据《教育部关于积极推进中小学评价与考试制度改革的通知》(教基[2002]26号)(以下简称《通知》)、《教育部关于印发〈普通高中课程方案(实验)〉和15个学科课程标准(实验)的通知》(教基[2003]6号)和《教育部关于进一步加强普通高中新课程实验工作的指导意见》(教基[2005]6号)的要求,普通高中学生综合素质评价要贯彻国家的教育方针,落实普通高中新课程实验对学生评价的要求,实行多元化评价、突出过程性评价、关注学生的个体差异,促进学生全面而有个性的发展。评价要充分发挥优化教育教学实践的功能,帮助教师不断更新教育观念、转变教学方式;促进学校严格落实国家课程方案,逐步建立适应普通高中新课程实验需要的教育教学管理制度;引导社会树立正确的人才观和教育质量观,营造全面实施素质教育的良好氛围。评价要遵循导向性、公平性、发展性和可操作性原则。学校每学年都要利用安徽省普通高中学生综合素质评价软件开展学生综合素质评价。
“安徽省普通高中学生综合素质评价系统(SES 5.0)”是安徽省基础教育管理部门为实施全省普通高中新课程改革素质评价工作而量身定制的信息化评价工具,系统针对安徽教育软硬件客观条件,方便各类教育单位进行安装和使用,系统实行数据和业务分离,采用业界领先的.Net中间件开发技术,标准的XML数据交换标准和WebService交换技术,开发过程采用CMMI模式体系管理。可以为每个用户按照自身的特殊需要和实际业务流程进行定制开发,并且可以在学籍系统的数据基础上定制教职工管理、学生信息等系统。 声明 “安徽省普通高中学生综合素质评价系统(SES 5.0)”由省教育厅立项,合肥华兴教育软件科技开发有限公司承接开发。任何组织或者个人未经允许与授权不得擅自复制、更改该软件的内容及其产品包装。如未经授权而擅自复制或传播本程序(或其中任何部分)将受到严厉的刑事及民事制裁,并将在法律许可的范围内受到最大的可能起诉。 许可: 我们将本软件程序的使用授权于您,但您必须向我们做以下保证:不在协议规定的条款之外使用、拷贝、修改、租赁或转让本系统或其中的任一部分。 您保证不: 1、对本软件再次转让许可 2、对本软件进行逆向工程、反汇编或解体拆卸 3、拷贝或转交本软件的全部或部分,但协议中明文规定的除外 您将本软件或拷贝的全部或局部转手给另一使用方之时,您的许可权即自行终止, 许可终止: 您若违反协议的任一条款或条件,许可可随时终止。终止许可之时,您必须立即销毁本系统及文档的所有拷贝并返还。 二、系统简介 1、“安徽省普通高中学生综合素质评价系统(SES)”开发介绍 “安徽省普通高中学生综合素质评价系统(CES)”是安徽省教育科学研究所为全省普通高中学生开展综合素质评价工作而量身定制的智能化评价系统。它是一批教育评价研究专家、教育行政管理人员、一线教师及专业软件开发技术人员的集体智慧结晶。“安徽省普通高中学生综合素质评价系统(CES)”被相关专家一致认为,系统根据先进的教育评价理念,充分考虑了安徽普通高中教学和技术装备的实际情况,能够很好地满足综合素质评价的需要,同时可以实现普通高中阶段学校学籍管理、教学管理等功能,具有易操作、针对性强、安全性好等特点,具有通用性和可拓展性,技术应用成熟,现决定全省普通高中学生综合素质评价中学校学生经常性综合素质评价中使用。 2、版本功能及系统定位 SES 5.0系统包括三个部分:学校版评价系统、省版(本手册不作介绍)。 学校版本可实现评价、管理、查询统计和分析等强大丰富的功能。 SES 5.0系统面向教育,立足普通高中教育,兼顾不同条件的硬件设施基础,支持不同层次的网络环境,满足广泛的客户需求,小到单一机房。大到校园网校际网。均可提供开展综合素质评价的解决方案。 3、其他功能 SES 5.0除了具备评价任务的基本功能外,还具备学校学籍、教学教务管理、新课程修习信息管理、系统日志用户管理在线更新和在线上报等功能。 三、系统安装配置 1、系统运行环境 服务器
电脑系统性能分析与评价
浅谈计算机系统性能评价的认识和理解 随着科学技术的日益进步,计算机也得到快速发展,计算机性能成为人们关注的重点。计算机性能评价不仅是计算机网络和计算机系统研究与应用的重要理论基础和支撑技术,也是当今通信和计算机科学领域的重要研究方向。因此,进行计算机系统性能评价成为当务之急。 计算机性能评价是指对系统的动态行为进行研究和优化,包括对实际系统的行为进行分析、测量和模拟按照一定的性能要求对方案进行选择,对现有系统的性能缺陷和瓶颈进行改进,对未来系统的性能进行预测,以及在保证一定服务质量的前提下进行设计。性能评价技
术研究使性能成为数量化的、能进行度量和评比的客观指标,以及从系统本身或从系统模型获取有关性能信息的方法。性能评价通常是与成本分析综合进行的,借以获得各种系统性能和性能价格比的定量值,从而指导新型计算机系统(如分布式计算机系统)的设计和改进,以及指导计算机应用系统的设计和改进,包括选择计算机类型、型号和确定系统配置等。 1 计算机系统性能评测指标 计算机系统性能指标有两类:可用性、工作能力。 可用性:它指计算机能够持续工作时间,一般用平均无故障时间和可恢复性来表示。 工作能力:它指计算机在正常工作状态下所具有的能力。它们是系统性能评价的主要研究对象。常用的工作能力指标由:吞吐量、延迟和资源利用率。 吞吐量:单位时间内系统的处理能力,指单位时间内完成的任务数。对于不同目标可能含义不同。例如,在评价一个数据库系统时,所指的吞吐量可以是单位时间内交易完成的个数;在评价一个网络系统是,吞吐量指单位时间内传输的字节数等。 延迟:完成一个指定任务所花费的时间。例如,在评价一个数据库系统时,可以考察它完成一个查询,或完成一个数据处理所需要的时间;在评价一个网络系统时,可以考察发送一个网络包所需要的时间等。 资源利用率:指完成一个任务所需要花费的系统资源。例如完成一个数据处理、所占用处理器的时间、占用内存的大小或占用网络带宽的大小等。 吞吐量越高、延迟越少、资源利用率越低则表示系统的性能越好。 2 计算机性能的主要评测手段 计算机性能的主要评测手段主要包括测量、模拟、分析方法。 测量方法:测量是最基本、最重要的系统性能评价手段。测试设备向被测设备输入一组测试信息并收集被测设备的原始输出,然后进行选择、处理、记录、分析和综合,并且解释其结果。上述这些功能一般是由被测的计算机系统和测量工具共同完成的,其中测量工具完成测量和选择功能。测量工具分硬件工具和软件工具两类。硬件测量工具附加到被测计算机系统内部去测量系统中出现的比较微观的事件(如信号、状态)。典型的硬件检测器有定时器、序列检测器、比较器等。例如,可用定时器测量某项活动的持续时间;用计数器记录某一事件出现的次数;用序列检测器检测系统中是否出现某一序列(事件)等。数据的采集、状态的监视、寄存器内容的变化的检测,也可以通过执行某些检测程序来实现。这类检测程序即软件测量工具。例如,可按程序名或作业类收集主存储器、辅助存储器使用量、输入卡片数、打印纸页数、处理机使用时间等基本数据;或者从经济的角度收集管理者需要的信息;或者收集诸如传送某个文件的若干个记录的传送时间等特殊信息;或者针对某个程序或特定的设备收集程序运行过程中的一些统计量,以及发现需要优化的应用程序段等。硬件监测工具的监测精度和分辨率高,对系统干扰少;软件监测工具则灵活性和兼容性好,适用范围广。测量方法是最直接、最基本的方法,其他方法也要依赖于测量的量,但是它比较浪费时间,只适合于已经存在并运行的系统。 分析方法:分析方法可为计算机系统建立一种用数学方程式表示的模型,进而在给定输入条件下通过计算获得目标系统的性能特性。该方法一般应用于系统的设计阶段,这时候因
临床试验研究病历
肺功能仪有效性和安全性临床试验 研究病历 试验用医疗器械编号:□01肺功能仪(型号规格:MSPFT-B) □02肺功能仪(型号规格:MasterScreen)临床试验机构:□河南省人民医院 □郑州市第六人民医院 版本号和日期:MS201608 2016年08月06日 受试者姓名: 联系方式: 联系地址: 受试者随机号: 研究者姓名: 试验开始时间:年月日 随访结束日期:年月日 申办者:河南迈松医用设备制造有限公司
在正式填表前,请认真阅读下列填写说明 研究病历填写说明 1.参加本试验的研究者必须经过GCP培训,必须事先充分了解本试验方案及有关资料,严格按方案执行。 2.所有筛选者均需填写研究病历,研究病历用黑色签字笔填写。 3.病历填写务必准确、清晰,不得随意涂改,错误之处纠正时需用横线居中划出,并签署修改者姓名及修改时间。举例:58.6 56.8ZS 2016.12.16 4.受试者姓名拼音缩写四格需填满,两字姓名填写两字拼音前两个字母;三字姓名填写三字首字母及第三字第二字母;四字姓名填写每一个字的首字母。 举例:张 红 李淑明 欧阳小惠 5 字,多余空格以“0”填写完整,不得留空。“ND”未查或漏查;“UK”不知道; “NA”不适用。 6.试验期间应如实填写不良事件记录表。记录不良事件的发生时间、严重程度、持续时间、采取的措施和转归。如有严重不良事件(包括临床试验过程中发生需住院治疗、延长住院时间、伤残、影响工作能力等)发生时,必须立即通知临床试验单位临床试验机构伦理委员会及该临床试验的申办者并上报国家食品药品监督管理总局。 7.临床试验应严格按照临床试验方案要求进行。试验不同时期需完成的检查和需记录的项目 要按照要求完成。请对照试验流程表执行。 严重不良事件报告途径:
可靠性及系统性能评价
两个部件的可靠度R 均为0.8,由着两个部件串联构成的系统可 靠度为:0.64;由这两个部件并联构成的系统的可靠度为:0.96。 串联系统: 设系统各个子系统的可靠性分别用R1,R2,R3、、、、、,Rn 表 示,则系统的可靠度R=R1*R2*R3*、、、、、*Rn 。 如果系统的各个子系统的失效率分别用R1,R2,R3、、、、 Rn 表示,则系统的失效率为R=R1+R2+、、、、+Rn 。 并联系统: 系统的可靠性R=1-(1-R1)*(1-R2)*、、、、、*(1-Rn )。 系统的失效率R=∑=n j j R 1111 平均无故障时间(MTBF )与失效率的关系为:MTBF=1/R 。 内存按字节编址,地址从90000(H )到CFFFF (H ),可以通过 内存容量的计算公式:内存容量=终止地址-起始地址+1, 内存容量=CFFFF (H )-90000(H )+1=40000(H )=256KB 。 基于Windows 、Linux 和UNIX 等操作系统的服务器称为开放系 统。开放系统的数据存储方式分为内置存储和外挂存储两种,而外挂 存储又根据连接方式分为直连式存储和网络话存储,目前应用的网络
化存储方式有两种,即网络接入存储和存储区域网络。 开始系统的直连式存储(DAS) 网络接入存储(NAS)是将存储设备连接到现有的网络上,来提供数据存储和文件访问服务的设备。DAS服务器是在专用主机上安装简化了的瘦操作系统文件服务器。 存储区域网络(SAN)是一种连接存储设备和存储管理子系统的专用网络。 廉价磁盘冗余阵列RAID RAID分为0~7这8个不同的冗余级别,其中RAID0级无冗余校验功能;RAID1采用磁盘镜像功能,磁盘容量的利用率是50%;RAID3利用一台奇偶校验盘来完成容错功能。所以如果利用4个盘组成RAIDS阵列,可以用3个盘用于有效数据,磁盘容量的利用率为75%。RAID0的磁盘容量利用率是最高的。 P239 项目段式管理页式管理段页式管理划分方式 虚地址 虚实转换 主要优点简化了任意增长和收缩的 数据段管理,利于进程间共消除了页外碎片结合了段与页的有点 便于控制存取访问
临床诊断性试验研究方法的探讨
中华肝脏病杂志 CHINESE JOURNAL OF HEPATOLOGY 1999年 第7卷 第2期 No.2 Vol.7 1999 临床诊断性试验研究方法的探讨 刘续宝 王家良 疾病的诊断是临床工作的出发点和治疗的前题,诊断性试验是临床医师赖以作出准确诊断的重要工具,因此诊断性试验本身的准确性往往影响疾病诊断的正确与否。诊断性试验不仅限于实验室诊断,也适于影像学诊断和临床诊断。 一、诊断性试验的设计原则 诊断性试验的结果和实际疾病的关系有四个可能的结果如表1。两种正确的诊断结果为当疾病存在时的试验的结果为阳性(异常),或疾病不存在时的试验的结果为阴性(正常)。相反试验的结果则可能发生两种错误的分类结果,即疾病不存在而试验的结果为阳性,或疾病患者的检测结果为阴性。两种正确的结果和两种错误的结果相对比例是评估该试验优劣的基本出发点,因此诊断性试验的设计就是围绕这个出发点进行。 表1 诊断性试验结果与疾病状态的关系 试验结果 疾病状态 有无 阳性真阳性(a)假阳性(b) 阴性假阴性(c)真阴性(d) 1.确定金标准:诊断性试验准确性评价依赖于疾病存在与否的准确性分类,即了解受试者的疾病实际存在情况是诊断性试验评价的前题,而能提供公认的疾病准确分类的诊断标准称为“金标准”(也称为标准诊断),如果金标准选择不恰当,则整个试验的评价即失去了准确性的基础。金标准通常包括病理诊断(组织活检和尸体解剖)、手术探查和发现特殊的影像学诊断,如冠心病诊断采用的冠状动脉造影和尚缺乏特异性诊断方法而采用医学权威机构颁布的综合诊断标准。 有些金标准本身就是操作简单、安全、价廉的诊断,如HIV病毒的抗体检测等,但多数的标准诊断较为复杂,而临床医师和患者对简单、安全的方法较之危险性较大、昂贵、繁琐的诊断(即使其准确性较高)更易接受,至少在开始是这样。因此诊断性试验的重要目的之一就是采用较为简单诊断方法来代替尽管准确性较高、但更为繁琐和危险的诊断方法作出临床诊断,但是须注意,只有在了解了错误分类的可能性和错误分类在可以接受的低水平,这个诊断方法才有临床使用价值。 2.确定样本量:足够的样本量是排除机会的干扰、如实反映诊断性试验准确性的保证,使评价指标如敏感性和特异性能如实反映诊断性试验的特性。通常随样本量的增加,反映试验的评价指标的准确性也增加,仅仅有10个受试对象,观测到的敏感性为
综合素质评价系统使用说明
-- - TYDZ_SYSM147606 潍坊市综合素质评价系统 使用说明 潍坊同益电子科技XX 二〇一四年
按照“促进学生全面发展基础上的个性发展”的素质教育要求,综合素质评价系统对学生综合素质发展状况进行全面、客观的评价。系统采用自评与他评相结合,过程性评价与终结性评价相统一,全面落实教育部提出的“道德品质”、“公民素养”、“学习能力”、“交流与合作”、“运动与健康”、“审美与表现”六个评价内容。结合初中学生实际,增加体现学生日常表现的“学习习惯”、“行为养成”评价。通过多元化的评价方式,全面反映学生的综合素质状况和个性特长,更好地促进学生自主全面发展,推动素质教育深入实施。 评价层次包括“常规性评价”、“主题性评价”、“标志性成果”。“常规性评价”是指对“学习习惯”、“行为养成”的评价,“主题性评价”是指教育部规定的上述六个评价纬度,“标志性成果”是指能够证明自己某一方面个性发展的实证性材料。 评价主体包括本人、同学、教师。 评价维度具体为《教育部关于积极推进中小学评价与考试制度改革的通知》中所提出的上述六个评价维度和根据学校自身情况独自设立多个评价纬度。 潍坊市综合素质评价系统为BS结构,以用户类型进行区分,现分为四类用户:管理员、学校管理员、教师、学生四种。下面就针对这四类用户的操作方法进行详细说明。
目录 一、管理员(超级)2 1.系统登录2 2.系统结构及使用流程3 (1)学校列表3 (2)综合查询4 (3)基础信息4 二、市级管理员6 三、县区级管理员7 (1)学校列表7 (2)综合查询7 (3)基础信息7 四、学校管理员10 1.系统登录10 2.系统结构及使用流程11 (1)评价管理11 (2)成绩管理15 (3)学生管理17 (4)学校设置18 (5)系统设置20 五、教师22 1.系统登录22 2.当前任务22 2.班级管理23 六、学生24 1.系统登录24 2.当前任务24 2.系统管理24 七、问题及解答26 一、管理员(超级) 即最高级管理员,用于整体数据的协调与查询。 1.系统登录 打开管理系统登录页面如下图1.1所示,输入正确的用户名、密码和显示的
教务评价系统
教务评价系统的需求分析与设计 摘要:教师教学质量评价系统对提高教学质量起着关键的作用。该系统通过Access数据库对系统涉及到的各种数据和数据关系进行设计,再使用Visual Basic 6.0程序设计工具通过ADO,ODBC技术对数据库的信息进行管理,从用户需求,系统结构设计,数据库设计,软件功能的实现等方面进行了详细的论述。该系统操作界面友好简单,采用了菜单、工具栏、状态栏等操作方式,系统能够完成各级用户的评教以及个人信息的查询,同时也实现了管理员对各类信息的有效管理。 关键词:教学质量;数据库;评价 0引言 当今社会可以说是信息技术的发展时代,在社会的方方面面无不涉及到各种信息的处理。信息是人们对客观世界的具体描述,是人们进行交流与联系的重要途径。人类的信息社会就是对信息进行有效合理的加工和处理,它将促进整个社会的发展。随着社会信息技术的不断提高,计算机已被广泛应用于当今社会的各个领域,成为推动社会发展的首要技术动力。在软件技术的应用中,软件的开发技术,尤其是应用型软件产品的开发技术成了重中之重。不断开发适应用户需求、市场需要的新型软件产品,参与市场竞争,获取最大利润是所有信息企业追求的目标。而随着我国当前高等教育规模的日益扩大,高校的教学管理任务日趋繁重[1],具备强大而高效的教学效果评价工具就成为保证和监督教学质量的关键条件之一,本系统着重研究教学质量评价及分析系统,提供师生对教学效果的评分,快速集中收集各方面的评教信息,为教务老师提供相关决策支持。《教务评价系统》[4]是一个非常实用的应用型软件产品,单说它的应用范围就十分广泛,只要有学校的地方,都可以采用本系统。计算机的作用就是辅助人们完成那些烦琐的体力劳动和脑力劳动,使人们从劳动力中解脱出来,《教务评价系统》就是辅助教务老师完成繁琐的资料统计工作[6]。总的来说该系统基本实现了对教师教学质量评价的需求。 1开发语言及环境简介
(完整)山东省普通高中学生综合素质评价信息管理系统操作手册学生用户手册
山东省普通高中学生综合素质评 价信息管理系统 操作手册 学生角色 二〇一七年五月
目录 文档编写目的 (3) 功能简介及使用注意事项 (3) 第一部分首页 (5) 一、通知公告 (5) 二、结果公示 (6) 三、点滴记录 (7) 四、同学圈 (7) 第二部分点滴记录 (8) 一、任职情况 (9) 二、奖惩情况 (12) 三、典型事例 (16) 四、研究性学习及创新成果 (20) 五、日常体育锻炼 (24) 六、心理素质展示 (26) 七、艺术素养 (27) 八、社会实践 (32) 九、陈述报告 (36) 十、陈述总报告(只有高三才有) (38) 十一、材料排序 (38) 第三部分档案查看 (39) 一、学期档案 (39) 二、材料记录 (42) 第四部分课程管理 (43) 一一 在线选课 (43) 第五部分我的课表 (44) 第六部分我的同学圈 (45)
文档编写目的 本文档用来指导学生用户快速学习、使用“山东省普通高中学生综合素质评价信息管理系统”(以下简称“综评系统”)。 功能简介及使用注意事项 1. 学生使用主要流程,如下图: 其中个人记录包含:任职情况、奖惩情况、典型事例、研究型学习、日常锻炼、心理素质、艺术素养、社会实践、陈述报告九大部分。 筛选排序包含:任职情况、奖惩情况、艺术素养三部分。 材料检查包含:基础信息、奖惩情况、日常操行、课程修习、校本课程、体测数据、学校特色指标、教师评语八部分。 2.学生帐号及使用: 建籍完成后生成:1学生1家长 账号为省学籍号 学校管理员导出初始化账号和密码 线下下发 学校管理员可重置其密码
注意:学籍号不可重复使用 家长可绑定手机——》找回密码 3.学生记录综评资料 随时记录班级提交学校公示(5天)归档(3.1/8.1/5.1)PC+移动端 点滴记录可选入档案 佐证材料:文件(图片)+链接(视频) 注意:实名记录 入档材料虚假取消高考资格 4.学生筛选综评资料,并排序 学期末筛选 毕业学期前排序省里统一划线 注意:进入档案依据 5.学生查看他人评价 学籍信息有误——>学籍系统中修改 体测数据有误——>体卫艺平台中修改 成绩等有错误——>反馈给老师
客户评价系统评价器使用手册(单独评)
第一章系统登录 1.1 运行客户端程序 运行“客户评价综合管理系统”光盘,双击运行EVMS.Client.exe客户端程序,显示如图所示登录界面: 1.2 服务器连接设置 单击按钮,显示如下设置窗口。 数据服务器IP:数据接收、处理、分析、统计服务程序所在机器IP地址。 数据服务器端口:客户端与服务程序通信端口。 升级服务器IP:客户端更新版本所访问的机器地址。 显视方案:客户端提供三种外观显示方案绿色、黄色、蓝色。
1.3 登录 在上面的登录页面输入正确的用户名和密码,初始登入账号为:admin密码:admin 单击按钮。登录成功后系统的初始窗口如下所示:
第二章系统菜单栏操作说明 2.1概述 本章介绍的是系统菜单栏的操作说明,在以后章节此部分将不作详细说明。系统的公有部分主要包括三大部分: 功能选择菜单 机构选择树 查询工具栏 2.2业务查询功能选择主菜单 ①②③④⑤⑥⑦⑧⑨⑩○11 【说明】 ①机构选择:选择要查看的机构,弹出如图所示窗口。 ○A ○b ○c ○A模糊搜索:用户访问机构树的快速方式。 在文本输入区输入机构的名称首字母,系统会自动搜索符合条件的机构。 在文本输入区输入机构的汉字名称,系统会自动搜索符合条件的机构。 在文本输入区输入机构的编号,系统会自动搜索符合条件的机构。 ○b纵向滚动条,如果树太高,无法显示全部时会出现。拖动可查看全部机构树。
○c点击机构名,表示当前选中了此机构。 ②员工选择:选择要统计的员工,弹出如图所示窗口。 ○A ○b ○c ○A模糊搜索:用户访问员工列表的快速方式。 在文本输入区输入员工的名称首字母,系统会自动搜索符合条件的员工。 在文本输入区输入员工的汉字名称,系统会自动搜索符合条件的员工。 在文本输入区输入员工的编号,系统会自动搜索符合条件的员工。 ○b纵向滚动条,如果列表太长,无法显示全部时会出现。拖动可查看全部员工列表。 ○c点击员工名,表示当前选中了此员工。 ③业务选择:选择要统计的业务,弹出如图所示窗口。 ○A ○b ○c ○A模糊搜索:用户访问业务列表的快速方式。 在文本输入区输入业务的名称首字母,系统会自动搜索符合条件的业务。 在文本输入区输入业务的汉字名称,系统会自动搜索符合条件的业务。 在文本输入区输入业务的编号,系统会自动搜索符合条件的业务。 ○b纵向滚动条,如果业务列表太长,无法显示全部时会出现。拖动可查看全部业务列表。○c点击业务名,表示当前选中了此业务。 ④时间选择:选择不同的时间,弹出如图所示窗口。
安全性、可靠性及系统性能评价
您现在的位置:希赛网 > 云阅读 > 软件设计师考试习题集 > 习题1 第 9 章:安全性、可靠性及系统性能评价作者:希赛教育软考学院 来源:希赛网 2014年05月08日 习题1 上一节本书简介下一节 第 9 章:安全性、可靠性及系统性能评价作者:希赛教育软考学院 来源:希赛网 2014年05月08日习题2 上一节本书简介下一节 第 9 章:安全性、可靠性及系统性能评价作者:希赛教育软考学院 来源:希赛网 2014年05月08日习题3 第9章 安全性、可靠性及系统性能评价 9.1 习题 ●三个可靠度R均为0.8的部件串联构成一个系统,如图9-1所示。 图9-1 串联系统 则该系统的可靠度为__(1)__. (1)A.0.240 B.0.512 C.0.800 D.0.992 版权方授权希赛网发布,侵权必究 ● 两个公司希望通过Internet进行安全通信,保证从信息源到目的地之间的数据传输以密文形式出现,而且公司不希望由于在中间节点使用特殊的安全单元增加开支,最合适的加密方式是__(2)__,使用的会话密钥算法应该是__(3)__. (2)A.链路加密 B.节点加密 C.端-端加密 D.混合加密 (3)A.RSA B.RC-5 C.MD5 D.ECC 版权方授权希赛网发布,侵权必究 ● 某计算机系统的可靠性结构是如图9-2所示的双重串并联结构,若所构成系统的每个部件的可靠度为0.9,即R=0.9,则系统的可靠度为__(4)__. 图9-2 先串联后并联系统 (4)A.0.9997 B.0.9276 C.0.9639 D.0.6561
上一节本书简介下一节 第 9 章:安全性、可靠性及系统性能评价作者:希赛教育软考学院 来源:希赛网 2014年05月08日习题4 上一节本书简介下一节 第 9 章:安全性、可靠性及系统性能评价作者:希赛教育软考学院 来源:希赛网 2014年05月08日习题5 上一节本书简介 下一节 第 9 章:安全性、可靠性及系统性能评价作者:希赛教育软考学院 来源:希赛网 2014年05月08日习题6 上一节本书简介下一节 版权方授权希赛网发布,侵权必究 ● 某公司服务器上存储了大量的数据,员工使用服务器前首先必须登录。为了保证安全,使用认证技术__(5)__.为保证传输效率,使用__(6)__加密算法对传输的数据进行加密。 (5)A.对登录系统的用户身份进行认可 B.保护数据在传输中的机密性 C.保证数据在传输中不被非法修改 D.防止登录信息被泄漏出去 (6)A.RSA B.ECC C.MD4 D.3DES 版权方授权希赛网发布,侵权必究 ● __(7)__不能保障公司内部网络边界的安全。 (7)A.在公司网络与Internet或外界其他接口处设置防火墙 B.公司以外网络上用户要访问公司网时,使用认证授权系统 C.禁止公司员工使用公司外部的电子邮件服务器 D.禁止公司内部网络的用户私自设置拨号上网 版权方授权希赛网发布,侵权必究 ● 若某计算机系统是由500个元器件构成的串联系统,且每个元器件的失效率均为10-7/h,在不考虑其他因素对可靠性的影响时,该计算机系统的平均故障间隔时间为__(8)__小时。 版权方授权希赛网发布,侵权必究
7.非随机实验性研究、诊断性试验及动物实验的质量评价工具
? 循证理论与实践 ? Meta 分析系列之七:非随机实验性研究、诊断性试验 及动物实验的质量评价工具 曾宪涛,庄丽萍,杨宗国,董圣杰 [中图分类号] R4 [文献标志码] A [文章编号]1674-4055(2012)06-0496-04 基金项目:湖北省教育科学“十二五”规划2012年度重点课题(2012A050),湖北医药学院2011年度优秀中青年科技创新团队项目(2011 CZX01) 作者单位:442000 十堰,湖北医药学院附属太和医院口腔医学中心(曾宪涛);复旦大学附属肿瘤医院中西医结合科 上海医学院肿瘤学系(庄丽萍);复旦大学附属公共卫生临床中心中医科(杨宗国);苏州大学附属第一医院骨科(董圣杰) 通讯作者:董圣杰,E-mail:dongshengjay@https://www.sodocs.net/doc/612146477.html, doi :10.3969/j.1674-4055.2012.06.003 非随机实验性研究(non-randomized experimental study )和诊断准确性试验的Meta 分析是临床研究重要组成部分,而临床前的动物实验的Meta 分析也日渐得到重视,其结论已成为循证决策的依据之一。在前面的章节中,我们已对随机对照试验[1]及观察性研究[2]的质量评价工具进行了简介,现对较为常用的或推荐使用的非随机实验性研究、诊断准确性试验及动物实验的评价工具进行简介。1 非随机实验性研究 1.1 M I N O R S 条目 非随机对照试验方法学评价指标(methodological index for non-randomized studies ,MINORS )[3]是由法国外科医师Slim 等在2007年全面回顾文献及专家共识的基础上制定的临床干预研究的质量评价工具,特别适用于外科非随机对照干预性研究(non-randomized surgical studies )质量的评价。评价指标共12条,每一条分为0~2分。前8条针对无对照组的研究,最高分为16分;后4条与前8条一起针对有对照组的研究,最高分共24分。0分表示未报道;1分表示报道了但信息不充分;2分表示报道了且提供了充分的信息(表1)。 1.2 Reisch评价工具 1988年,为了促进临床药物治疗性研究质量的评价,美国德克萨斯大学医学部的Reisch 等[4]制作了相应的评价工具,即Reisch 评价工具。该工具以公认的标准和清单为基础,归纳了12个类别共57个条目,其中包括设计、样本量、随机化和对照组的相关内容。清单的主要作用是评价研究的设计和绩效而不是数据的分析。该工具的每个条目都是以确定的问题形式出现,回答方式包括“是”,“否”,“不知道或不清楚”或“没有合适的答案”。Reisch 评价工具主要是针对临床药物治疗质量的评价, 因此很多条目具有明显的临床药物特殊性。该工具对于非随机实验性研究的质量评价可用度较高,但需结合实际的研究做一些调整以发挥该工具的评价功能。现被Cochrane 肠道炎症疾病小组使用,因其条目繁多,使用耗时,易用性不强,在此不作详细介绍。 1.3 TREND声明 TREND (the Transparent Reporting of Evaluations with Nonrandomized Designs )声明[5]是美国疾病预防控制中心(Centers for Disease Control and Prevention ,CDC )HIV/AIDS 综合防治研究(PRS )小组为提高对艾滋病防治行为干预研究的综合能力,于2003年7月在亚特兰大召开的CDC 下属期刊编辑会议上达成的共识。与会者认为更清晰和标准的研究评价报告不应只包括随机设计,还要扩展到非随机对照设计,由此提出非随机对照设计报告规范(TREND ),会议等具体内容可参阅官网https://www.sodocs.net/doc/612146477.html,/trendstatement/。自然,这一规范可以用来非随机实验性研究的质量,因此不是专用工具,在此不作详细列出。2 诊断性研究 诊断性研究一般而言可以分为两类:一是评价运用诊断试验后对改善患者的治疗/预后效果,多采用随机对照设计,此时质量评价方法与随机对照试验相同[1];二是评价诊断试验的准确性,此种最为常见及熟知。 2.1 QUADAS工具 QUADAS (Quality Assessment of Diagnostic Accuracy Studies )是由英国约克大学Whiting 等遵照Delphi 法于2003年制定的专用于系统评价中评价诊断准确性试验质量的工具[6-7]。QUADAS 工具是目前唯一一个经过严格评价和验证的诊断准确性试验质量评价标准,共14个条目,每一条目采用“是”、“否”或“不确定”评价(表2)。2008年,Cochrane 协作网推荐QUADAS 作为Cochrane 诊断性试验准确性系统评价中质量评价的标准,并根据协作网的筛查和诊断性研究方法学组的意见,将QUADAS 的第3条、第8条和第9条列入非必须评价条目,故Cochrane 诊断性试验准确性系统评价中质量评价的标准最终为11条[8]。 2.2 Cochrane DTA工作组标准 Cochrane DTA 工作组(Cochrane Diagnostic Test Accuracy Working Group )除了将上述QUADAS 工具作为推荐使用的评价工具外,还在此基础上针对特定的研究设计制定了附加质量评价条目[9]。特定的研究主要包括延迟验证(需要对研究对象进行纵向随访)研究和诊断比较(避免选择性偏差和独立的多重测试评估),可能附加的质量条目如下:①是否在研究开始前已确定了临界值(cut-off value )?②研究开始后试验的技术指标是否未发生改变?③研究是否提供了阳性结果的清晰定义?④试验操作者是否接受了适当的培训?⑤治疗是否在测试指标和参考标准执行后停止?⑥是否报告了观察者间差异(observer variation )的数据,以及是否在可接受的范围内?⑦是否报告了仪器间差异(instrument variation )的数